
If you you have an interest in developing and using Open Source solutions you should get involved in a couple of new groups. First one is the LinkedIn IBM i OSS Group, Here you will be able to engage in conversations about Open Source and what we are trying to achieve. The next stop should be the Gitter chat room where people discuss their activities and issues as they progress through to providing Open Source. I am sure as we move forward new and better communication channels will appear.
There are a number of tools you will require to get your ideas into the Open Source arena, We have settled on RDi as our IDE of choice and Git as the repository for storing the source code which will be used for others to contribute/download the source for compilation. While we have used RDi for a number of years (we will never go back to SEU under any circumstances) there were a lot of tricks we had not used to allow us to make the transition from IBM i source code to the files we will eventually make available on the Git Repository. This post is hopefully going to show the steps we took to create a Git Repository and move our source online to allow others to use and contribute.
Note : The source online today is not tested and should not be used at this time, we have just used it to test the process with real life code. When it is tested and functional I will post a message to the boards.
I have had a lot of help from the gitter chat room members particularly Buck Calabro, about how to set up RDi in such a way that allows pulling the source from the IBM i and pushing to the Git Repository, my thanks go out to those people who helped my learning experience. (Visit the chat room to see the conversations to understand some of the problems before reading on). There is one outstanding query re the support RDi 9.0.1 has to allow the sequence number removal (we wanted to remove the sequence numbers from the source prior to uploading to the repository) and as Buck stated, it may not be a big issue if you are going to use RDi for all your interactions with the repository? Anyhow if you have problems with RDi 9.0.1 let me know and I will update this post with the relevant information.
Obviously the screens we have provided and the process we took are specific to our environment, but you should be able to figure out how to accomplish the same results within your environment. The Git Repository is Public so you can go out there and pull the code once you have set up your environment. See note above about code status If you make a mistake (we did often) you can go in and delete everything and start again. The images you see are after many attempts to get this working and lots of RDi installs (9.5.03 trial installs), so don’t give up when things go wrong.
The original code we are using was developed using RDi, but our code development process was to always use RSE to access the code on the IBM i, as we need to get the source into a local git repository which in turn allows us to commit and push changes to the GitHub Repository, we had to change to using i Projects. Using i Projects allows the code to be pulled from the IBM i and stored locally on the PC. One downside to this is the code should only be changed in one place and code changes pushed back to the IBM i if required. There is no source control built into that process, so any changes made using your local copy could be overwritten when pushed to the IBM i if another user has his own local copy of the source and pushes his updates back to the IBM i after yours etc. (Note to self must look at how that can be fixed). This is a new concept to us so we have only scratched the surface about what is possible, our initial thoughts were to use the IFS and push from there to the GitHub Repository, but this approach seems a lot more intuitive.
As the code already existed on the IBM i in source files we needed to get that source code into the GitHub Repository (It will eventually be the master copy of the code not our IBM i source copies). Before we could start this we needed to set up our own GitHub Repository, you can get FREE public repositories (anyone can get at and download the code) or set up a private repository for a fee (would allow you to determine who can access the code). As this is Open Source we want others to be free to download the code so having a public repository made sense and being FREE made it even better. We have not shown how to set up your GitHub account or create the repository, its all very easy to do. We concentrate on how to get your source into that repository.
Our repository is located at https://github.com/ChrisHird/FTPCLNT, we will need this address when cloning the content to our local repository. RDi was started and the following process shows how we built the environment and pushed the actual code upto the GitHub Repository, the initial creation of the repository creates a few skeleton files which are copied to the local repository as part of the clone, we simply added the source to the local copy and pushed the changes to the GitHub repository.
So here are the steps we took…
First we needed to create a new RDi workspace for our project, we started up RDi and added the new workspace called FTPCLNT.

Once you press enter the new workspace will be created. and you will be presented with the RDi Welcome page

Next we will create a new connection to the IBM i for this workspace, this will allow us to copy the remote source code files to our local PC. To get to the following screen select the goto workbench icon or menu option from the Welcome Screen.

Select the option to create a new IBM i connection and the following dialog will be presented. Fill in the information about the remote IBM i that you need to connect to and press finish.

If the connection works you should now see it as shown below.

At this point we need to copy the Git Repository to our local system. This requires you open a new perspective in the workbench. Select Window>Open Perspective>Other and the following dialog will be presented, scroll down until you see the Git option and select.

You should now see the following perspective in your workbench.

We now need to copy the information we already have the the GitHub Repository into our RDi environment. To do this select the option to clone a Git repository from the perspective. this will bring up the following dialog. You will need to fill in the information for the GitHub repository. Other information is automatically filled in for you as you progress through the dialogs.

There are a number of other screens which we did not capture beyond the following dialog, the defaults were taken on each one that follows.

On finishing the local git repository was built and the files from GitHub had been downloaded. The following screen shows the results of the successful Git Clone.

Now that we have the base files copied from GitHub we are going to add the source files from our IBM i to the local repository and commit them to the GitHub Repository. First we open the i Project perspective, use the menu options to get to the following screen.

Create a new i Project using the options provided

The following dialogs are presented to allow the information to be entered. We are naming the project FTPCLNT which will reside in the FTPCLTOSS workspace, this determines the location of the files we are going to import, it also matches with the files that have been downloaded when the git repository was cloned.

The previous dialog does show an error because we had already created the i Project and I was replaying the process to allow the screen capture. Next we add the location of the source files, our source exists in library FTPCLTOSS so we associate that with the new project.

Once the project is created we want to import the source from the library onto our local PC, remember this is the staging area for the source as we push it to GitHub. We can update the source on the PC and push changes to the IBM i just as easily as we can push the source to the GitHub Repository. Use the options available from the project to import the source, the following screens show how our source was imported.


Once the source has been imported you should see the following in the i Project Workbench screen.

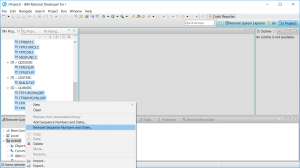
The source files in the i Project will have been copied with the sequence numbers in the file, if we commit the source content to the GitHub repository in this state the sequence numbers are going to be copied into the files as well. We wanted to be able to remove the sequence numbers before the source was committed. You will see from the Gitter chat room discussions this was not an easy task to work through. The following screens should hopefully be available (even in RDi 9.0.1) to allow this process to be carried out. First of all we need to change the Workbench preferences to allow the sequence numbers to be removed.Note : Workbench preferences not the i Project preferencesThe following screen shows how to use the mouse to select.

Or by selecting Window>Preferences and the following dialog should be presented.

You should now be able to remove the sequence numbers from the files, the following screenshots were taken as we removed them from our files (Note you can multi select the files).
Confirmation screen.

Now when you open the source files in RDi you will see that the sequence numbers have been removed. Note : This is only for the local copies, the remote copies in the IBM i source files have not been touched. If you push changes back up to the IBM i source files the sequence numbers will automatically appear, but will be reset.

As you have changed the files Git automatically registers that fact and loads the staging area with the files that have been updated. All we have to do now is commit and push those changes to the GitHub Repository. the following shows the process we followed.

Add a message which refelcts the reason for the new commit.

Once we press the Commit and Push button the changes will be copied to the GitHub repository.The following shows the new files are available.

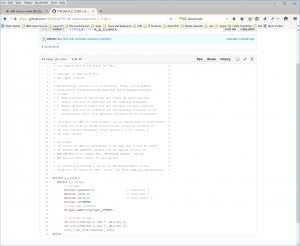
Taking the option to view the content of the files shows the source has been copied and no sequence numbers are in the file.
Thats it, we now have the source available for anyone to download and use. We will be taking some time to build and test the source before we release it as a working project. Testing the build files and linking into the Relic Package Manager have to be completed before we are finshed.
If you have any questions or problems while trying the above please post the to Gitter, that way others may be able to help you faster than I can.
Chris…