
The one we see discussed a lot on the IBMIOSS groups and various other mediums is the use of the PASE environment and a ported version of the Open Source application you intend to use. This is generally delivered as binary code which has been compiled ready to run in the PASE environment. The binaries have mostly come from a repository (Perzl) which has taken the Open Source and compiled it on an AIX system and are packaged to allow download, build and install using scripts that have been provided. While there are a lot of packages available they are not always the latest versions of the Open Source software and do have some issues when being installed in the IBMi PASE environment, we have seen missing core modules and non working features even in some of the core PASE commands that make the journey an eventful one. There are a number of people pushing hard to get this area of Open Source better supported on IBM i and I am sure a lot of the issues will be ironed out over the coming months and years to get more application running smoothly. I personally have a number of concerns with tooling available which I have discussed, hopefully as time progresses that will change.
Another option we have started to pursue is the use of IBM i native applications which we and others have made available on various source repositories, this is code which is compiled on the system using the native IBM i compilers. This just requires that people take their application source and make it available to the community. I see a number of barriers to this the main one being most of the applications that run on the IBM i have been developed as commercial applications, this would require a shift in the developers mindset to allow some of the substantial applications out there to be released as Open Source. The next issue will be the lack of developers willing to spend time adding more functionality and improvements with the cost of access to the IBM i remaining so high. We will still continue to release Open Source in this manner providing a number of tools that help with security and availability.
Another option is to run a Linux environment on your IBM i and while this seems to be a major deflection from the above options we feel it has a number of merits which should be considered. I think the biggest reason is the fact that there are more Open Source developers on Linux than any other platform and therefore more applications and they are updated and enhanced a lot more often. The Perzl binaries are the same source code which has been ported for use within the AIX environment, this does bring in some delays as you need to wait for the Perzl release before you can get the latest version of the application. While being on the latest and greatest version of an application may not be high on your companies agenda, being allowed more time to test the new functionality before being moved into production may be as some of that new functionality may be the game changer you need to to get ahead of your competition. Linux skills are a lot more abundant that IBM i skills so even if your existing IBM i tech staff are not skilled in Linux you will be able to find someone that is, plus those same IBM i staff are going to need to enhance their PASE skills anyhow (a lot of the AIX skills cross over to Linux and vice versa). IBM is also a big supporter of Linux on Power which has resulted in a number of the major Linux Distributions being ported to run on the Power Systems. This is one area we will concentrate most of our efforts going forward, we hope to harness the strengths of the IBM i and couple it with the strengths of Linux by providing tools and utilities to access the IBM i data and objects from the Linux partition.
We have been blogging about setting up a hosted LPAR on IBM i for a number of years, we currently run with 3 *GUEST IBM i LPARs running on an IBM i *HOST LPAR. The main reason for us to do this is to allow us to develop and demo our High Availability products across numerous OS levels with a minimal foot print. The *HOST partition is running IBM i V7.2 with 2 *GUEST IBM i partitions running V7.3 and one running V7.2. One of the V7.3 partitions is where we do all of our IBMIOSS work in terms of testing the IBM delivered offerings and the Perzl downloads etc.
The set up requires we have the ability to micro partition the IBM i CPU’s, we have 2 CPU’s licensed for IBM i which we have carved up across the *HOST and *GUEST partitions. The *HOST partition is given the most CPU/Memory as this is where all of the development works is carried out. All of the DASD is allocated to the *HOST LPAR and is raid 10 with a hot spare. The CPU is in a Shared Pool which allows the system to move the CPU resources to where it is needed, this is especially good as the demo LPAR’s need the power when demos are being run but taht power can be shifted to the development LPAR when we have major rebuilds being run. Micro partitioning required that we have a tool to carry out the configuration, we opted for the HMC. Howvere our HMC would not support the latest HMC code required by the Power8 system so we had to invest in a new one, we decided to go the vHMC route as it was much cheaper than purchasing a new HMC. A blog entry about setting up the vHMC can be found
here
Once you have the vHMC installed and linked to your Power System you can then configure the LPAR’s you require, we have already built the partitions for the IBM i *GUEST’s so we just needed to add the Linux LPAR to the mix. The first thing we had to do was move some of the resources away from the existing partitions to allow the Linux partition to be configured, this meant we had to update the existing profiles to reflect the new settings plus actively de-allocate some of the resources before the new partition could be configured. The other option would be to reconfigure the profiles and restart all of the partitions so the spare resources would be left unused.
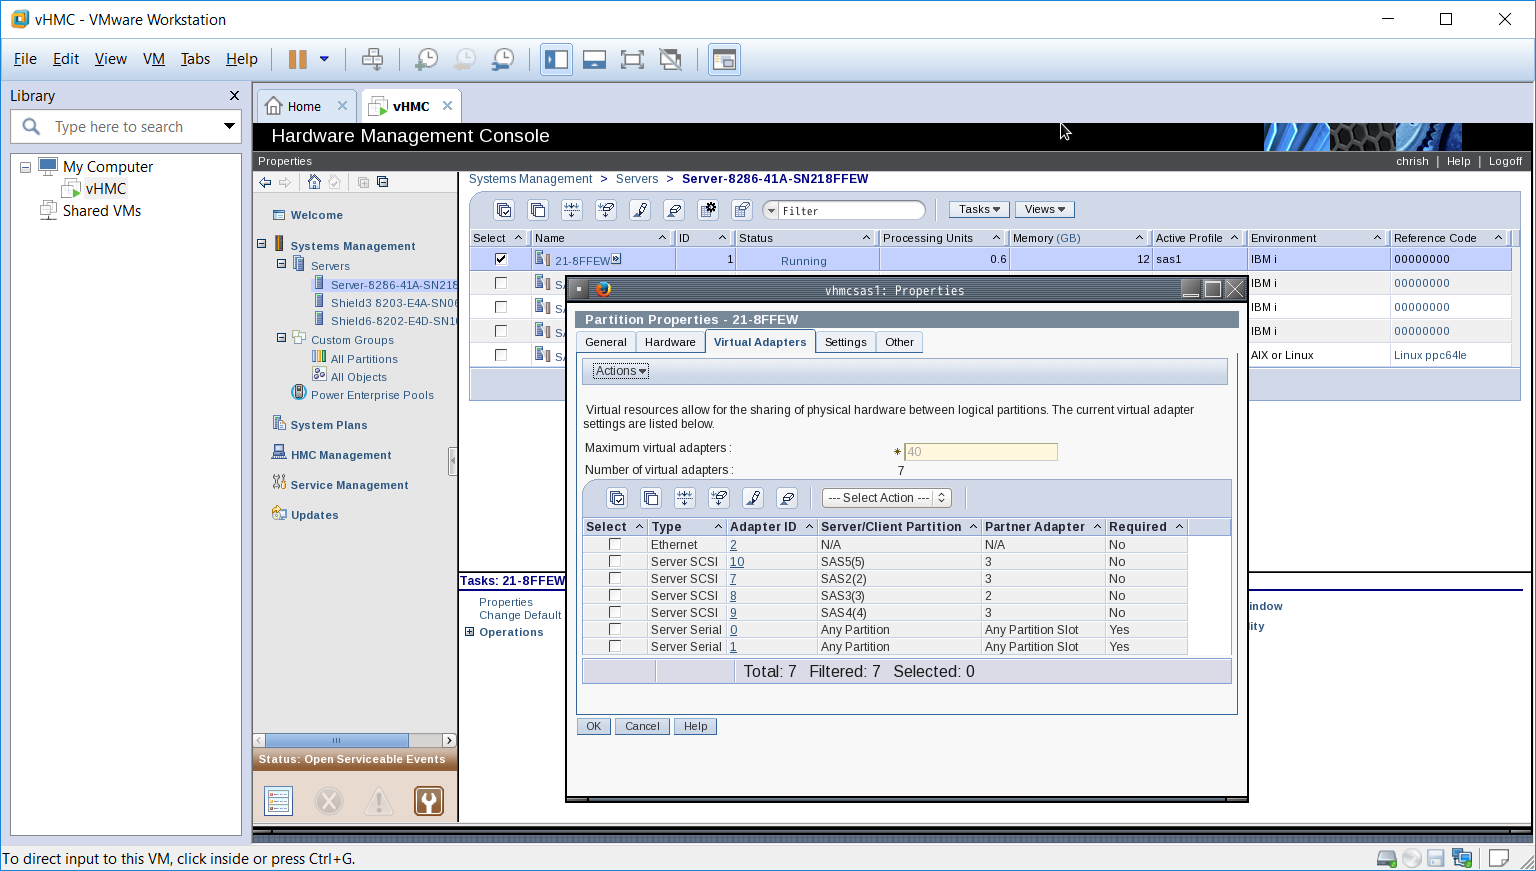
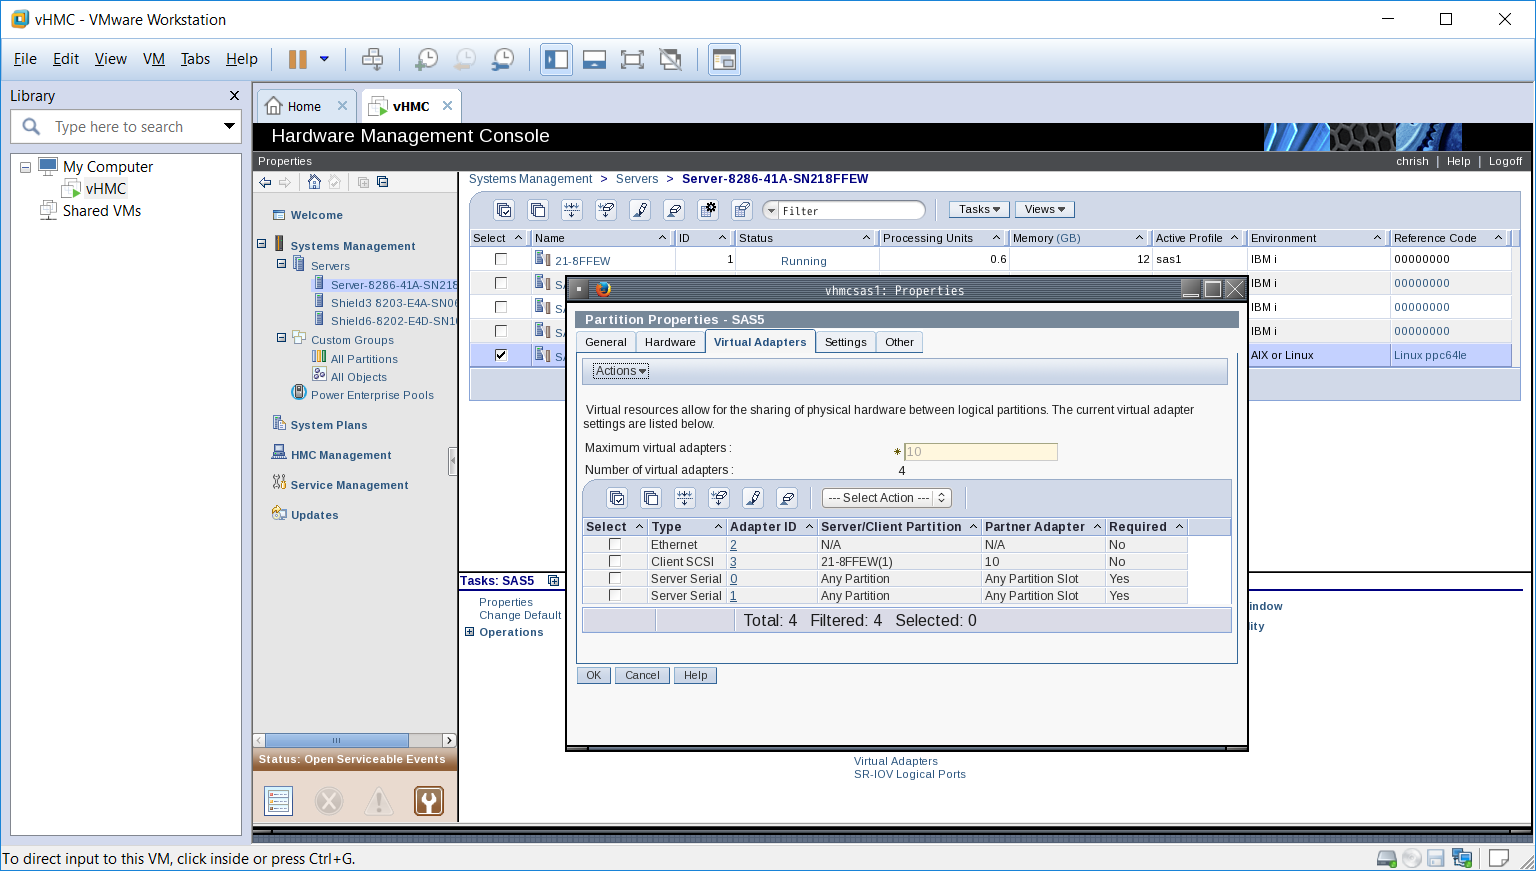
For our test we wanted to have a minimal Linux set up, we allocated 0.30 CPU, 1 Virtual processor and 2GB of memory, the DASD is allocated on the IBM i as a *NWSSTG attached to the *NWSD. The vHMC set up was pretty straight forward and there are plenty of redbooks and IBM docs to explain how to do this. (We did find a lot of the information was out of date and totally irrelevant to what we where trying to achieve but perseverance and a lot of Google’ing got us through. Maybe one day we will do a blog entry of exactly how to partition up an IBM i?) Key to getting it all working is to ensure you match the adapter ID’s when setting up the virtual adapters, the defaults IBM configures are generally wrong. Here is a sample of our virtual adapter set up, the first shows the hosting LPAR the second is the Linux guest we have set up.
Once you have configured the LPAR you will need to connect to the IBM i (start the LPAR) which will copy the config to the IBM i and allocate the required resources. If you have a problem with starting a Java terminal make sure you have the latest service pack for your HMC installed and any subsequent updates (this fixed the problem for us). Once you see the startup freeze (cant remember the SRC code) you can end the connection and go to the IBM i to configure the resources there.
The next thing you will need is the iso image for the Ubuntu install, we got ours from the following site, because we have a Power8 we can now use a Little Endian version or a Big Endian Version so we opted for the LE version.
http://cdimage.ubuntu.com/releases/16.04.1/release/?_ga=1.28851961.47314264.1476205255
The .iso file we downloaded is ubuntu-16.04.1-server-ppc64el.iso. which we burnt to a CD and loaded into the Power8 CD ROM, we did have some issues with the installer picking up the wrong CD image which was resolved by ending the Virtual Optical drives we had configured.
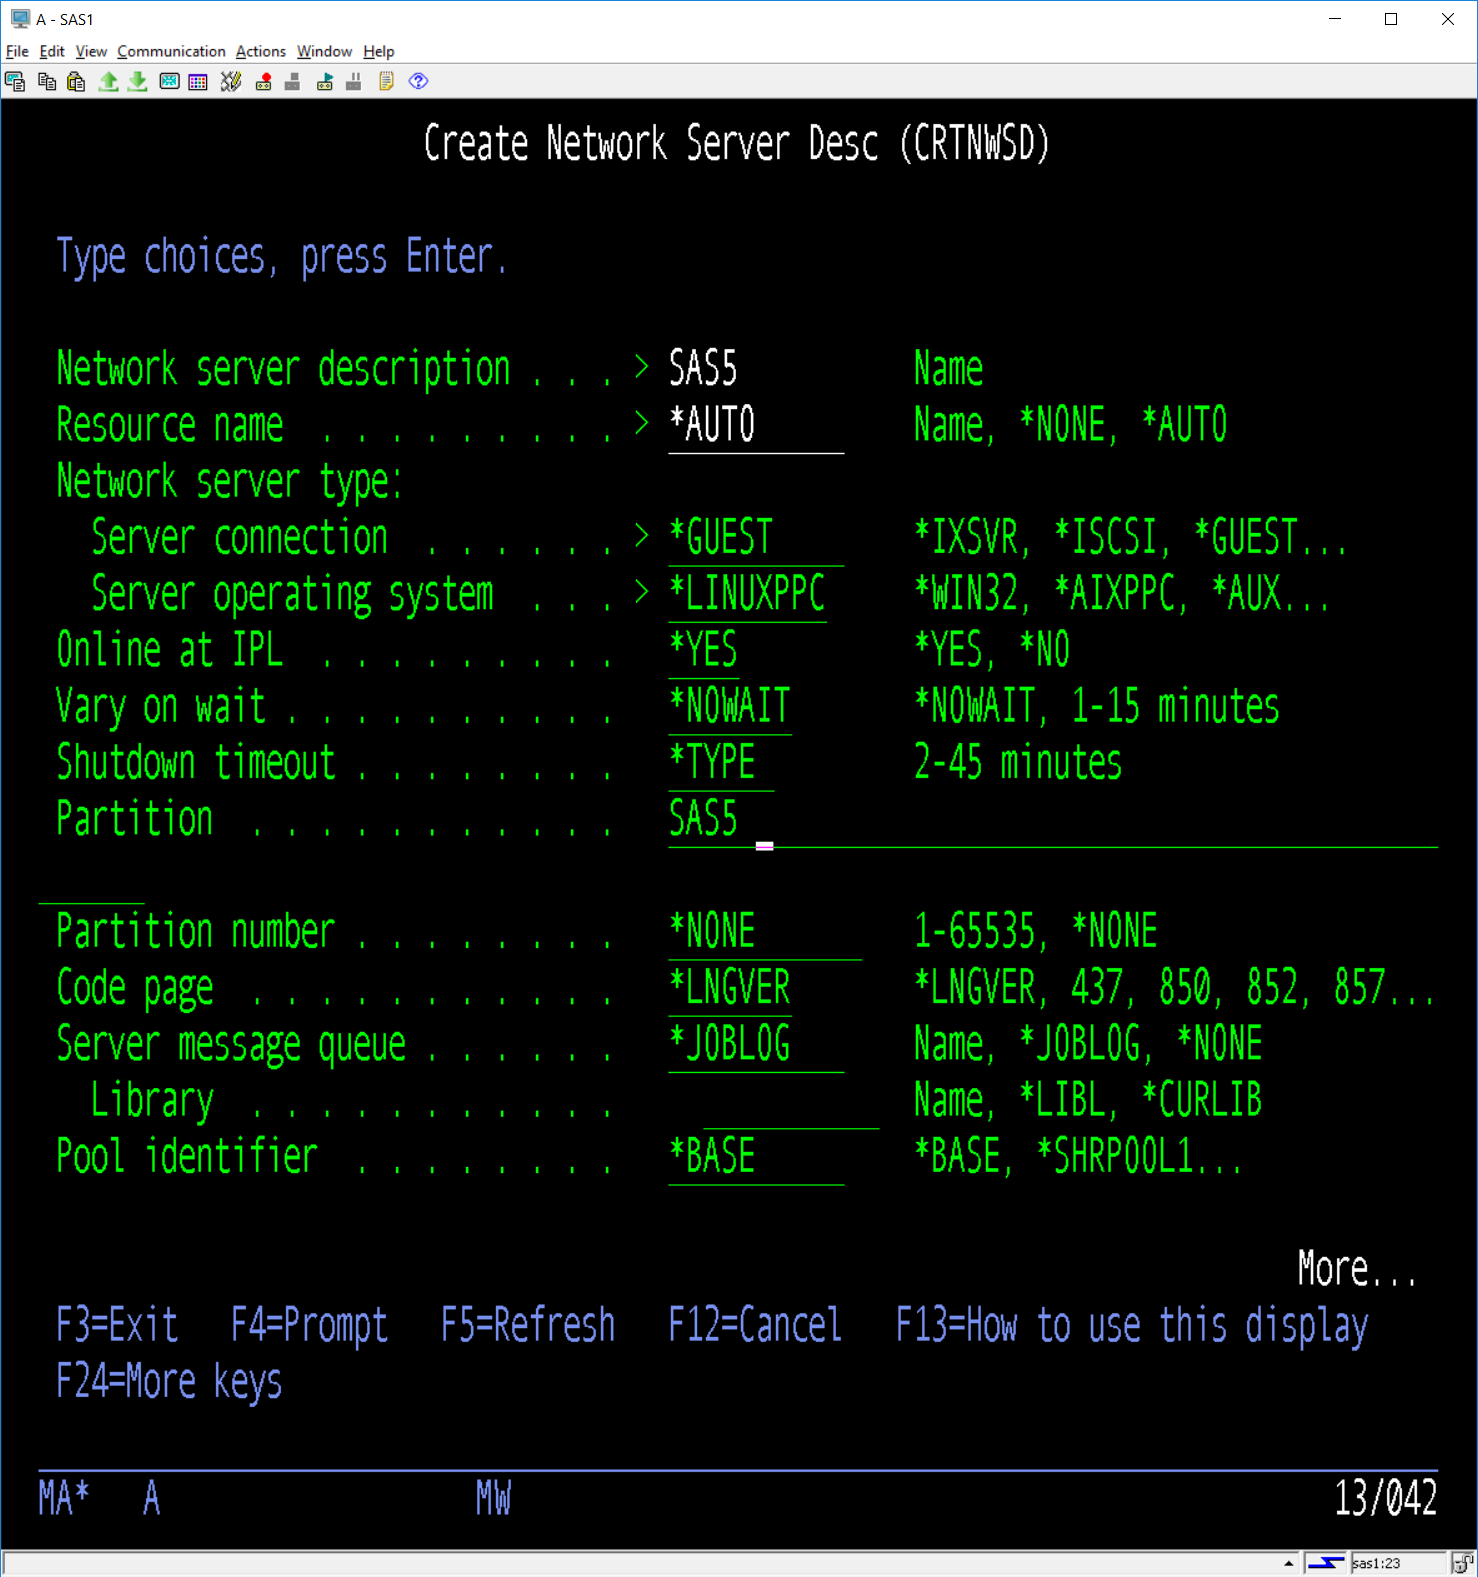
There are two elements to the IBM i side of the set up, the first is the *NWSD object which is the definition of the partition and the resources it will use. The following screens show the set up of our partition as it is running today. This is carried out on the *HOST partition or SAS1 in our case. We had already downloaded the Ubuntu iso image for the Power8 system, there are other iso which are for Power7 and other PowerPC platforms (MAC) so ensure you get the right one for your setup. (Note:- we could not get the Power7 server to install and Linux version for some reason which is one of the reasons we jumped to the Power8, if you are running a Power7 system you may encounter the same issues we had. IBM was involved but no solution was found before we switched to the Power8).
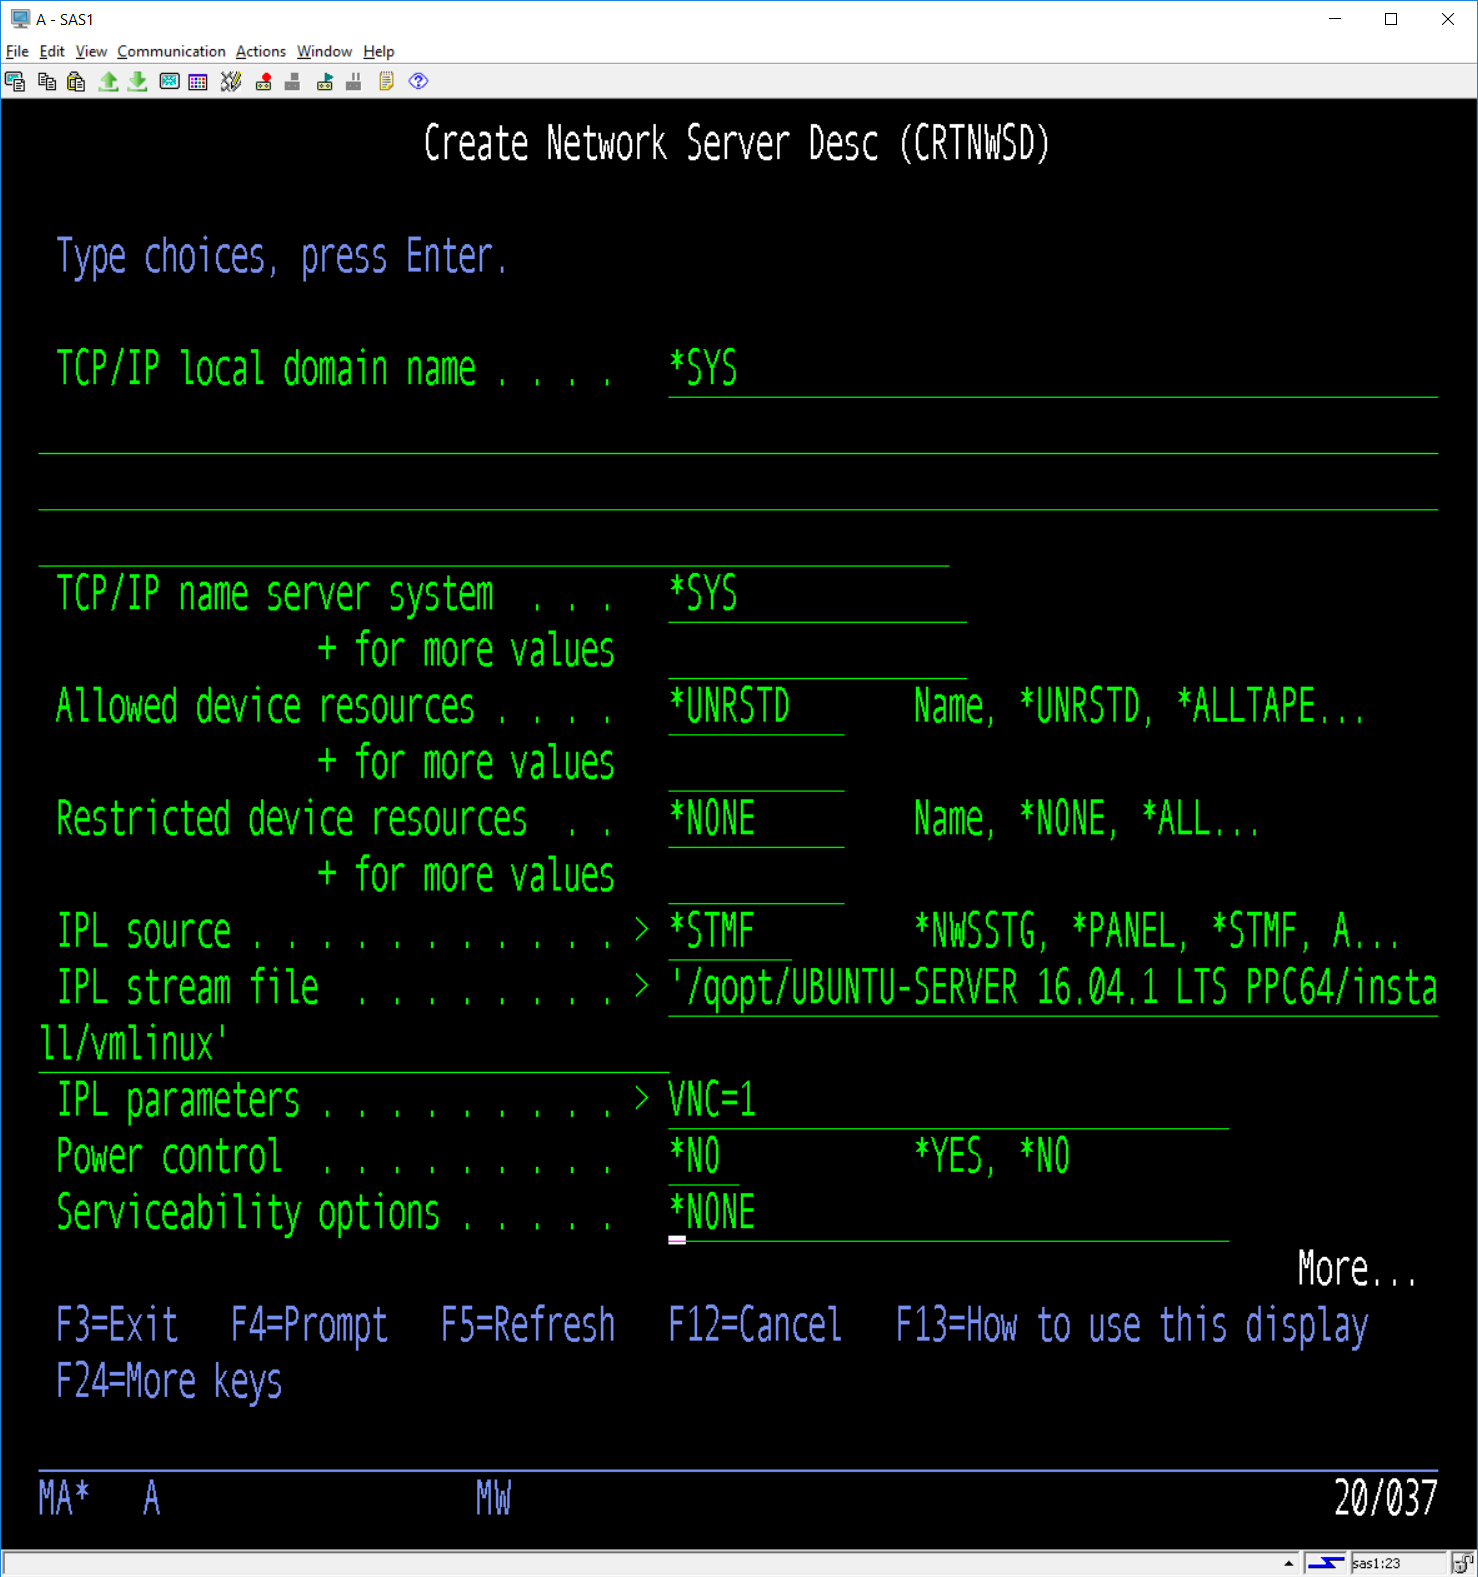
The following screens show the main configuration pages for the *NWSD, couple of important points to note are that the Resource Name was set to *AUTO and the name used for the Partition exactly matches the name given to the partition when configured on HMC, also the Power Control is set to *NO. When you first start the installation of the partition you will need to point the IPL source to the CD ROM and the vmlinux file which can be found in the install directory of the CD ROM.
Next you will need to allocate the storage for the partition and link it to the *NWSD. As we discussed above we just added 26GB (we can increase this later if needed) from the SAS1 DASD. Remember when this is allocated the system defines it all as used, unlike other objects which will only take up the DASD as they need it (Virtual Tape can do this etc) so allocating a lot more than you need is just going to waste resources.

The allocation of the storage may take some time as the DASD has to be formatted so now might be a good time to go get that coffee. Once it is finished you can then link the *NWSSTG to the *NWSD suing the follwoing command in our example.
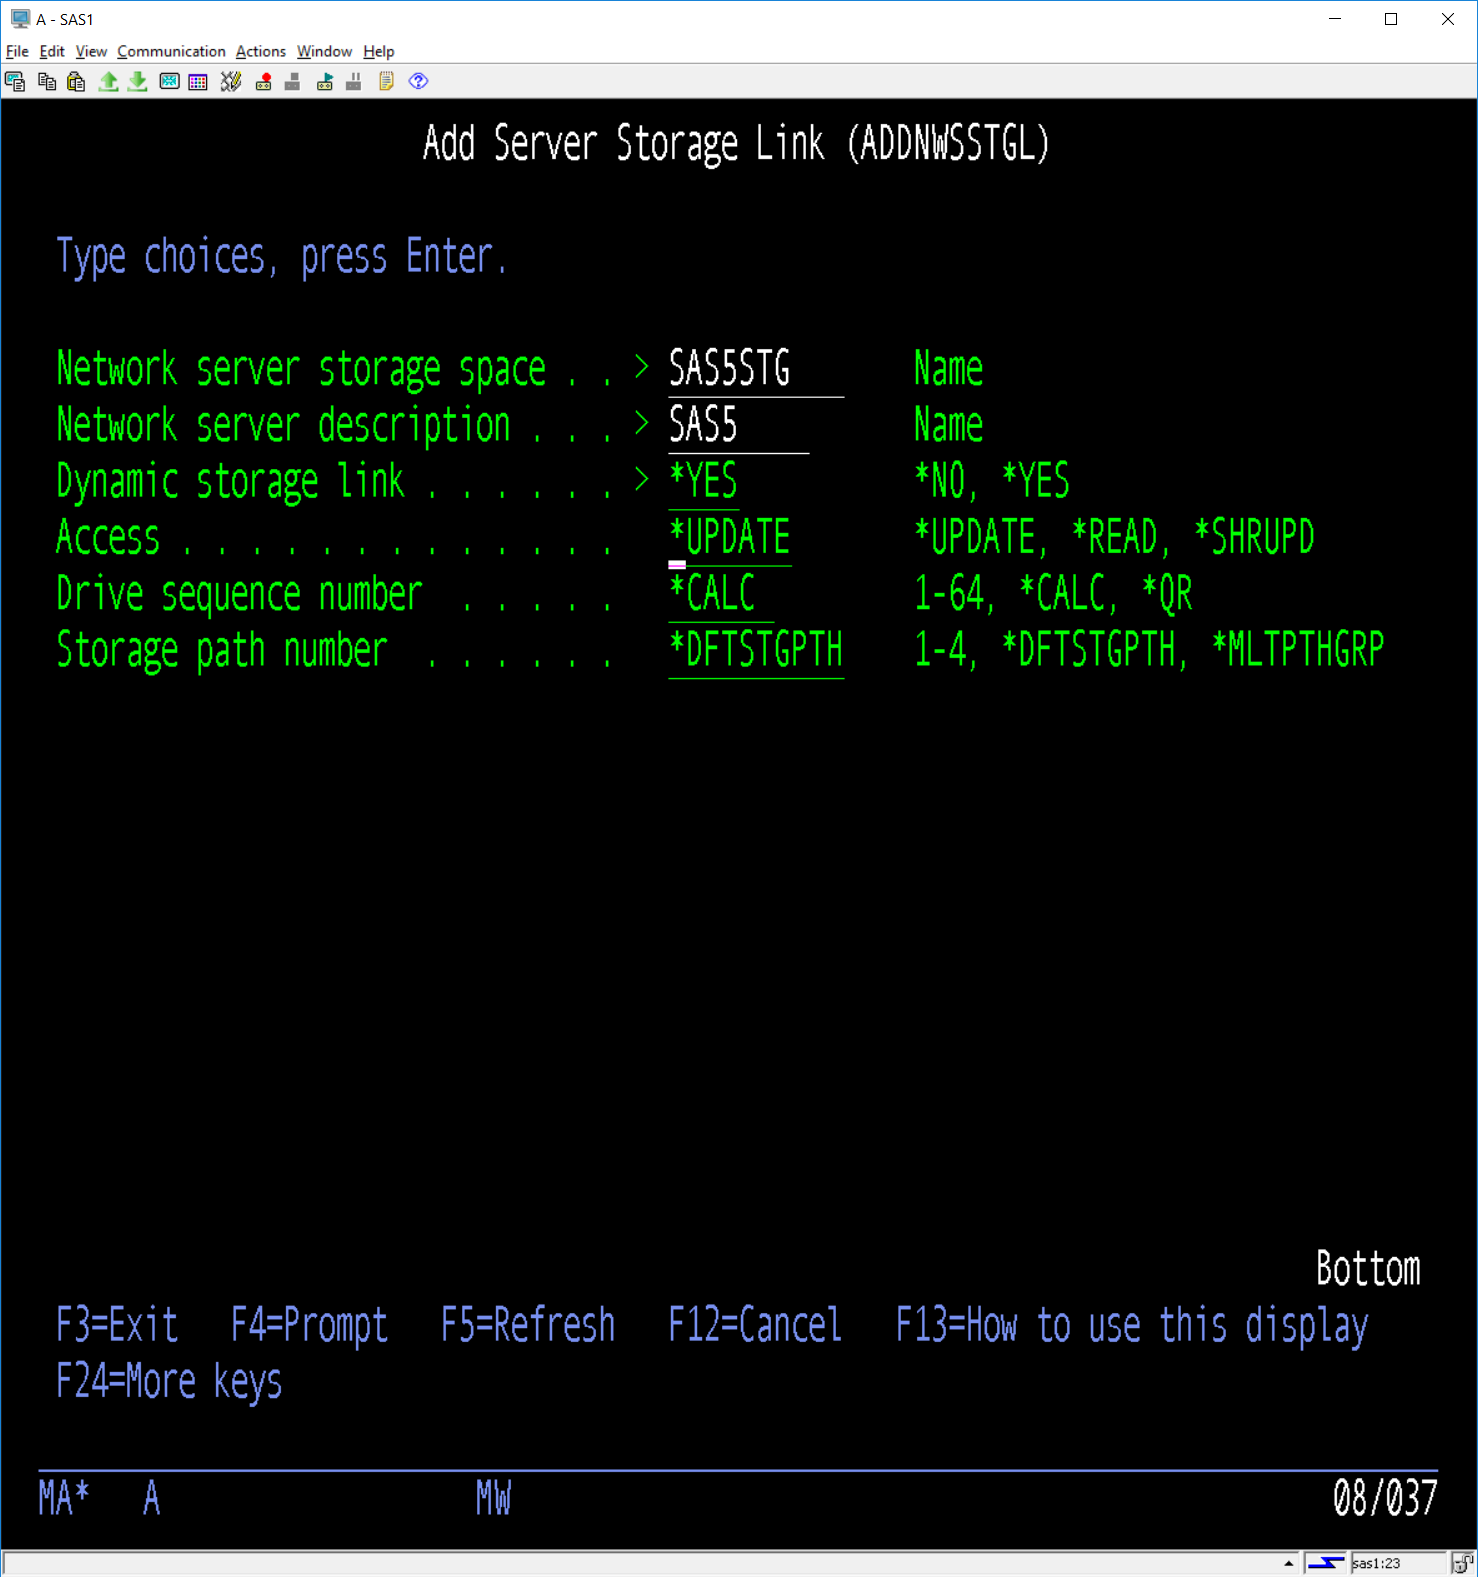
Once this is all done you can then start the *NWSD, if it does not go active there is a problem which needs to be resolved. Our initial attempts did not go active due to a problem with the link we had entered to the vmlinux file, the NWSD would go into *FAILED state with an error message in our joblog.
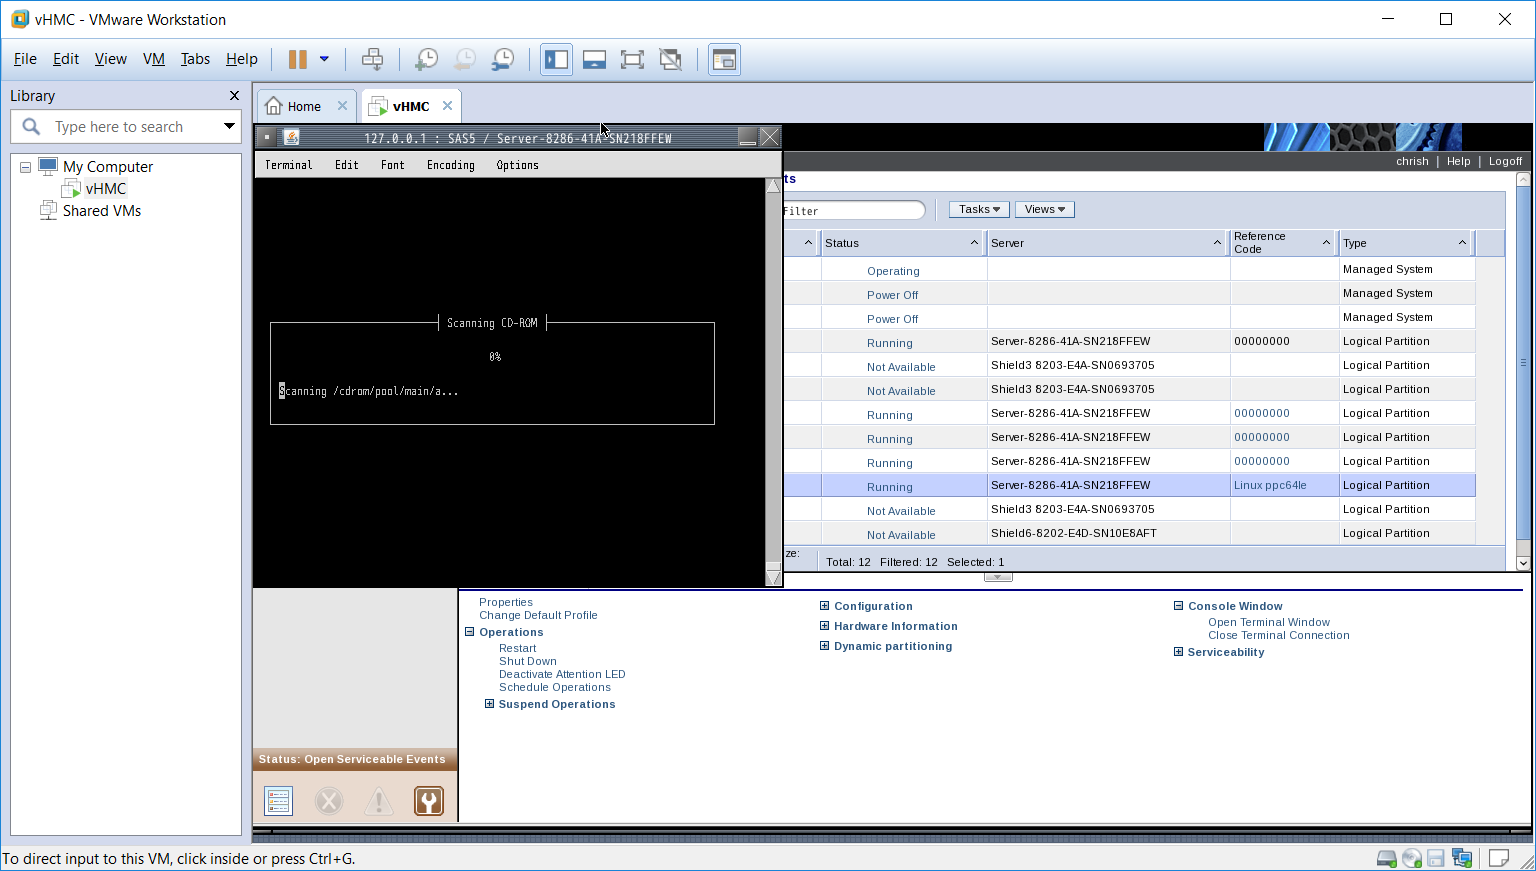
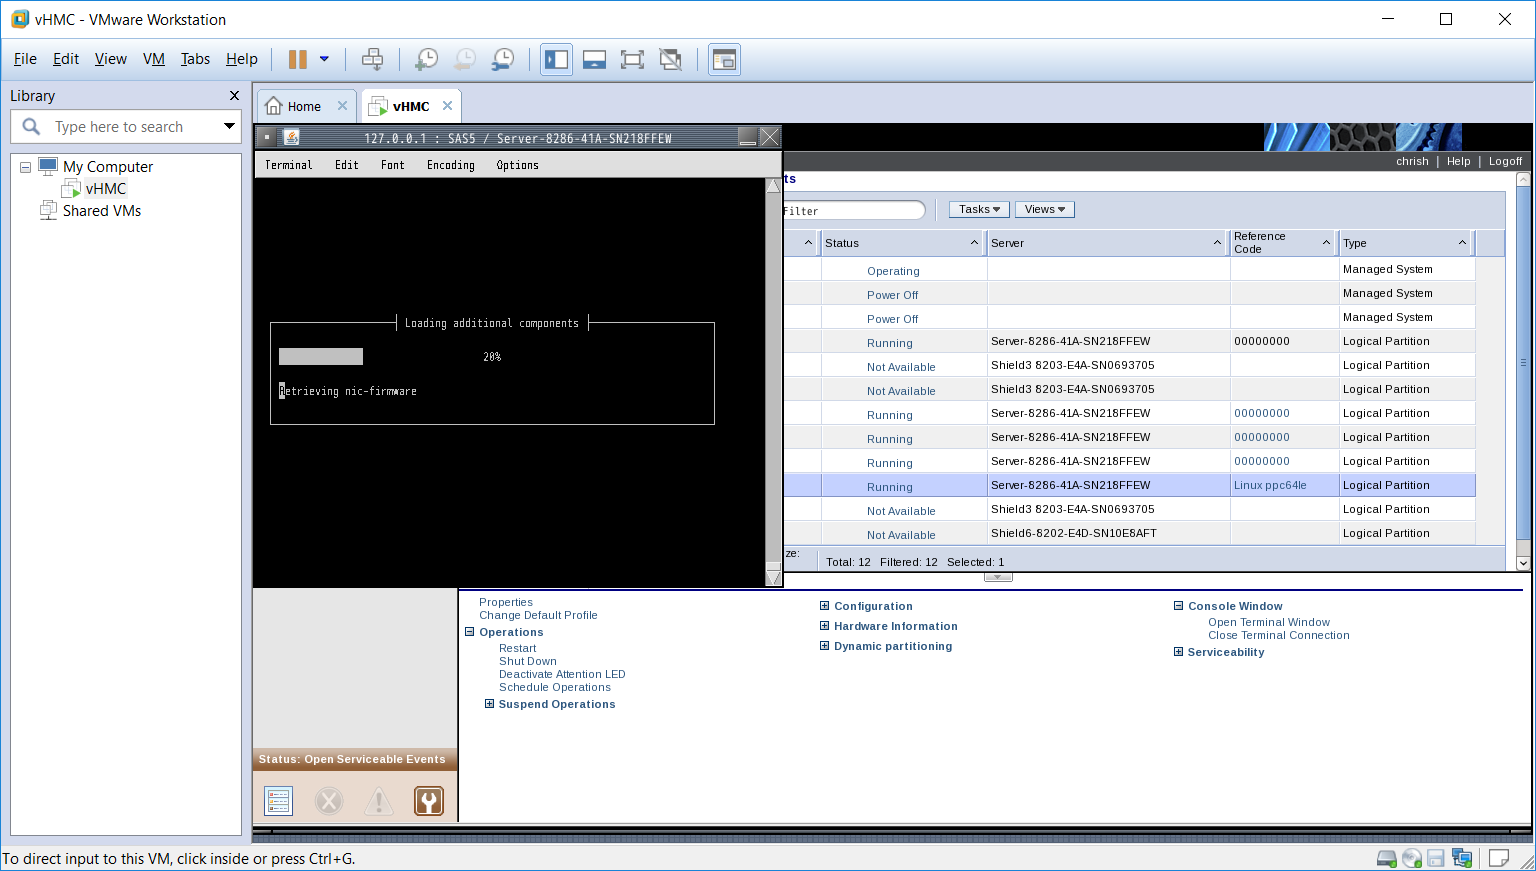
To install Ubuntu we had to start a terminal session within the vHMC to the IBM i using profile we had created. The initial screens seemed to take some time to start in comparison to installing IBM i hosted LPAR’s which made us feel like this was going the way of the other attempts but after a while we did get the IBM startup screens which allow you to enter the start up device for the installer. Capturing all of the install screens was pretty difficult until we realized the print screen we took of the screens was only available inside the VM, once we clicked the actual VMWare Workstation window we were able to capture things a lot easier and paste them into a holding document. You will have to enter the install device (we just used the options to select the device from a list of all devices) plus set some additional options as the installer starts to progress. Below are a few sample screens as the install progressed, we did try to capture all of the screens which we deemed important but we missed a number that we maybe should have captured :-(. Once the terminal set up had completed we then got into the actual install process for Ubuntu, again we did notice quite a long period of blank screens before things started to happen, eventually we saw that the install was progressing because the install CD was being scanned. The following is not a complete preview of the installation process, we missed a number of the screens and have omitted many others for the sake of expedience. The total time it took to get the install up and running on the Power8 was about 1 hour, that may seem like a long time but it does include a lot of time spent capturing screens and resolving issues,
The next step seemed to retrieve the hardware information.

The above steps took a few minutes to complete. Next came some basic configuration for the network etc.

I missed a number of screens in the network but most of them are simple to understand, we eventually used Linux commands to set up the network as we needed it anyhow which we explain a little later.
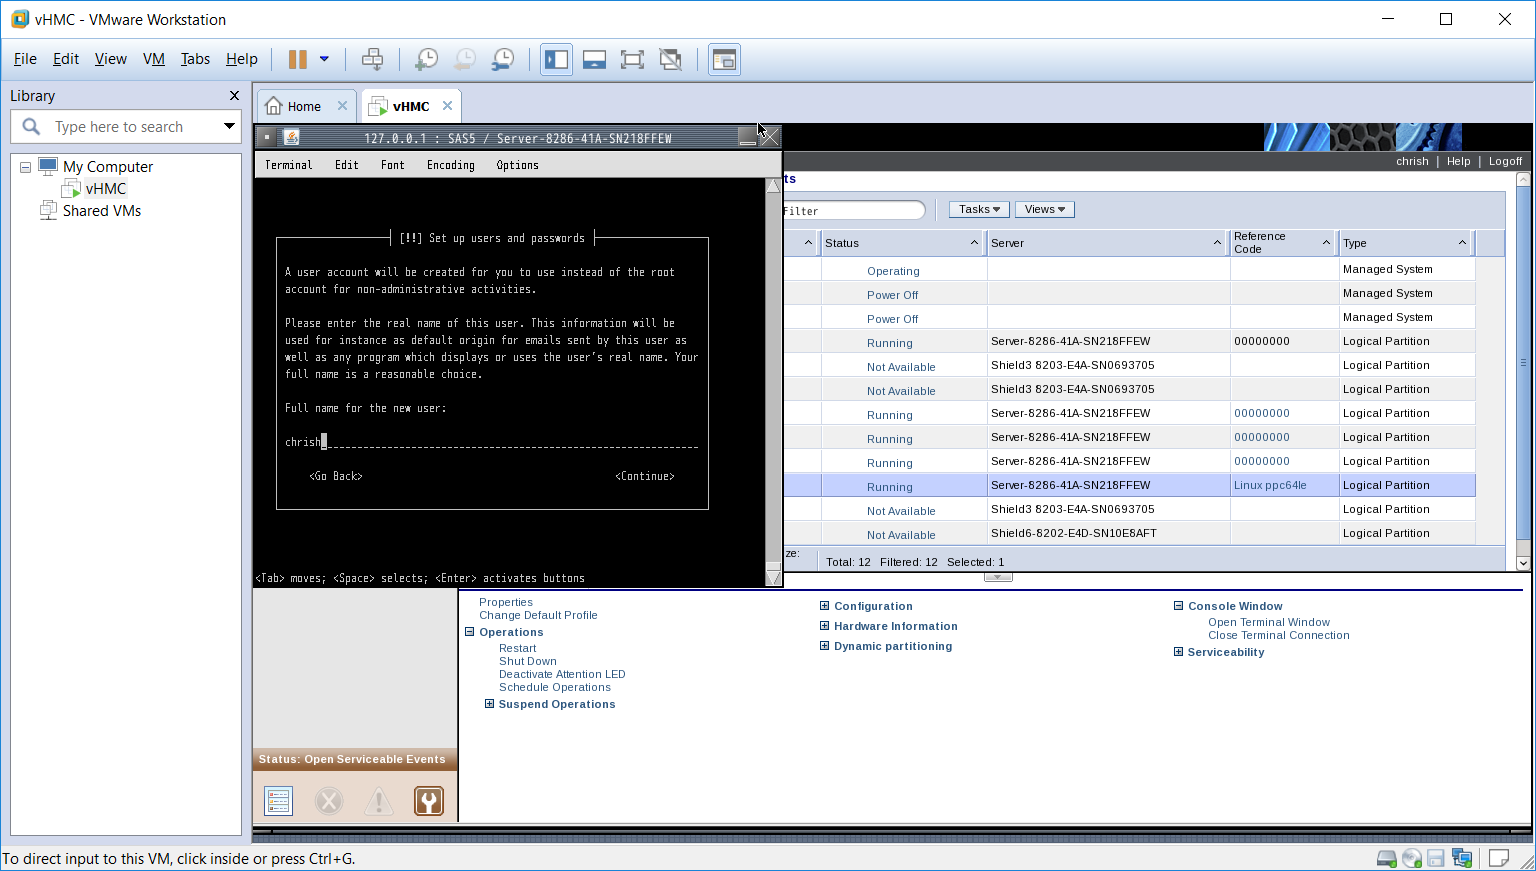
Ubuntu does not enable the root user so the installer will ask you for a user name which will be used, we just used an abbreviated name instead of a full name as can be seen from the screen shot.
The installer gives you the option to encrypt the user directory, we did not take the option. A further set screens were presented for collecting the Time Zone information and time etc. Once the information had been collected it went through and collected some hardware information again? maybe it was specific to the disk setup as the next step was to partition the disks. We just took the defaults.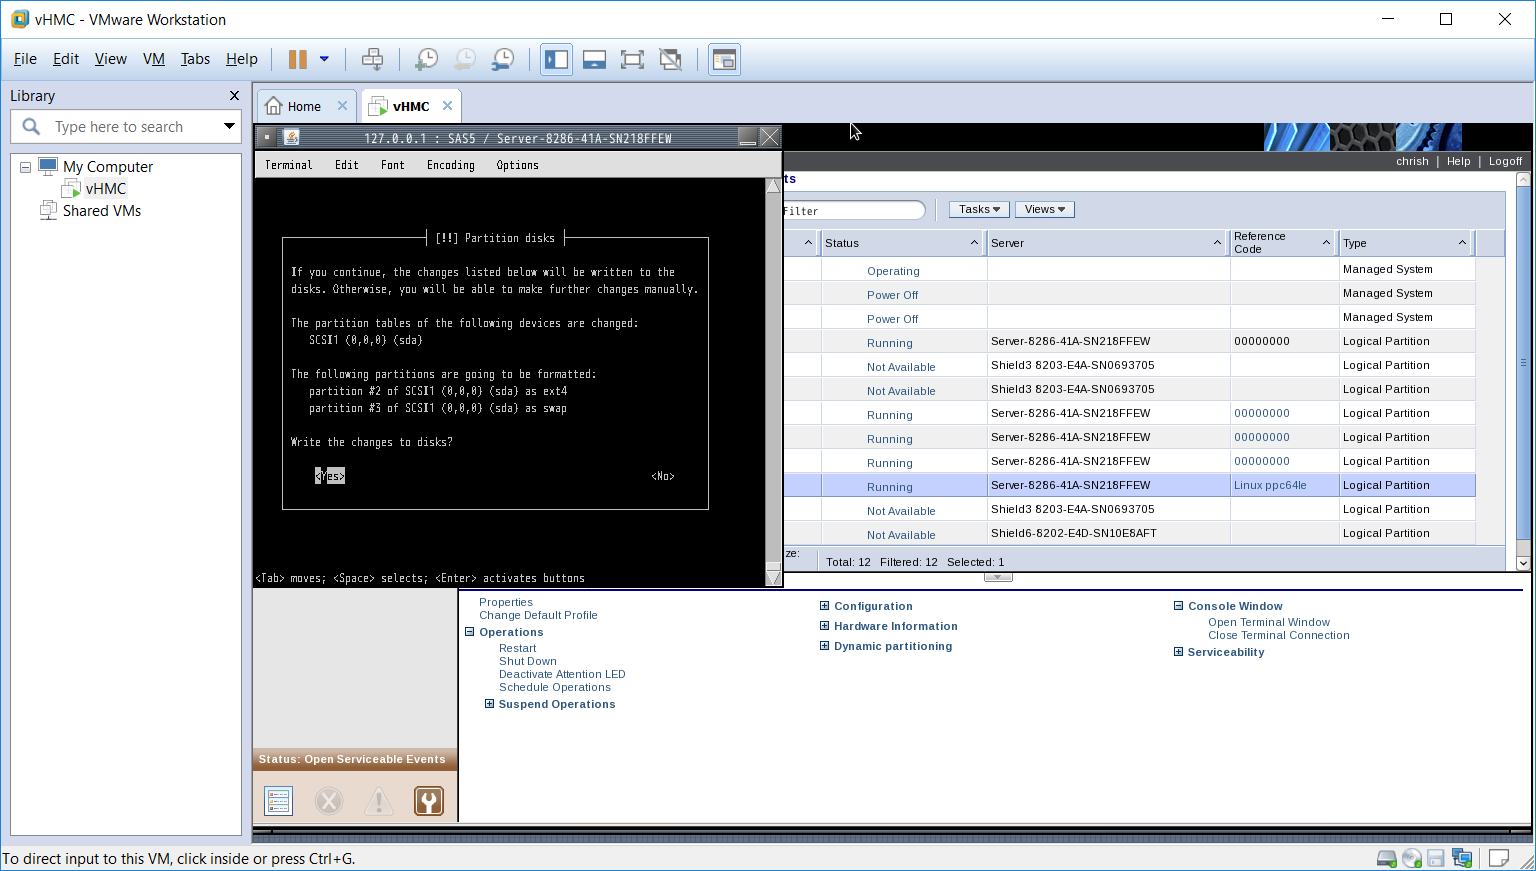
Partition Setup
Once this had been completed we saw that the actual install of the Linux data was being carried out onto the disk.

The next step was the set up of the HTTP server, we do not use a proxy so we took the defaults. The next screen requested the update policy we wanted to set. We like to keep things as up to date as possible so we opted to have all updates automatically downloaded and installed.

The last screen shows the installation completed. Pressing continue restarts the Linux partition. We had to change the boot information in the *NWSD first as the existing information would simply start up the CD again. Setting the boot option to *NWSSTG will start the Linux Partition from the DASD that we had just configured and installed to, we had to restart the *NWSD for the change to take effect. Now we have a sign on screen when we use the terminal session in the vHMC, while this is OK we really wanted to have a SSHD (putty terminal) to connect to the Linux Partition. A number of other options were required such as setting up the IP address of the partition, we had taken the default which is to use the DHCP server to assign the address, we like to use fixed IP addresses for our servers. The SSHD server is installed as part of the base install, once we had the network configurations set we were able to connect to the partition with no problems.

We did a number of additional steps to bring the entire install up to date using the APT package manager and installed Webmin. One of the problems we had with Webmin is that there are no binaries for PPC64 on the webmin site, we had to download the source and build from scratch. The install seemed to fail midway through which led us to think it was no going to run, however after some investigation we found that the interfaces did come up and we could use the functionality we tested. It may be we have to do some additional processes to fix things up as we could not test all of the functionality of Webmin, that will happen as we progress through our test of Unbuntu running on the Power8 🙂
If you are interested in setting up a partition on your own system and need our assistance let us know, the information provided by IBM is not that recent and we found very confusing. I think running partitions created using the micro partitioning capabilities of Power Systems is something many need to get involved in. Carving out resources for development or testing especially for Open Source projects is something we should all understand.
Chris…